[iOS] Notification Service Extensionのセットアップと実装するメソッドまとめ
Table of Contents
iOSのプッシュ通知は、画像・音声・動画のリッチコンテンツを添付することが可能です。事前にアプリにバンドルされているコンテンツであれば、特別な対応は必要ありません。しかし、APNsから配信するリモート通知でWeb上にあるリッチコンテンツを表示する場合は、Notification Service Extensionで対応します。今回は、リモート通知のリッチコンテンツ対応として、Notification Service Extensionのセットアップ方法をまとめます。
- Notification Service Extensionのセットアップ
- リッチコンテンツのダウンロードと、通知へのセット方法
- ログインが必要な場合など、アプリ本体のターゲットとの情報共有方法
事前準備 #
プッシュ通知のセットアップを行います。 以前投稿した「プッシュ通知のセットアップから実装するメソッドまとめ」の内容を済ませておきます。
Notification Service Extensionをプロジェクトに追加する #
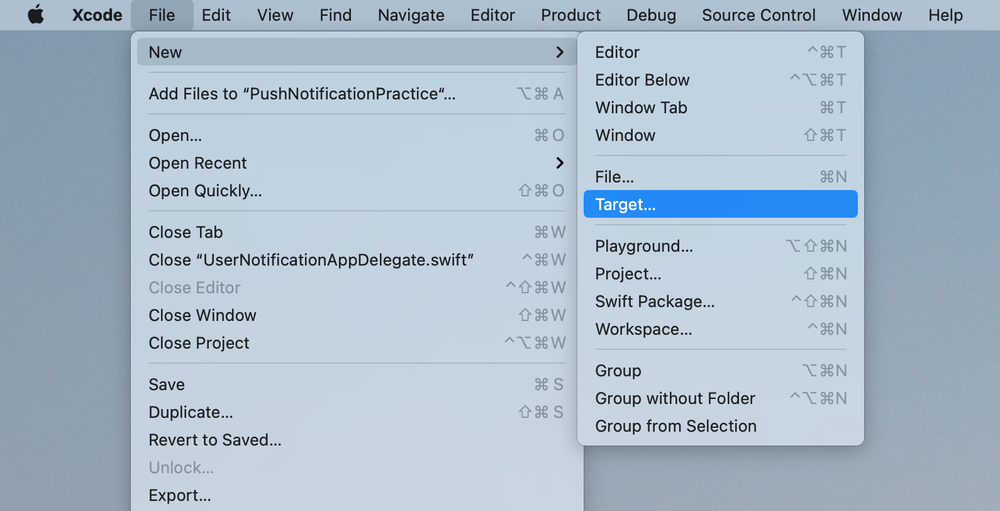
File > New > Targetを選択します。
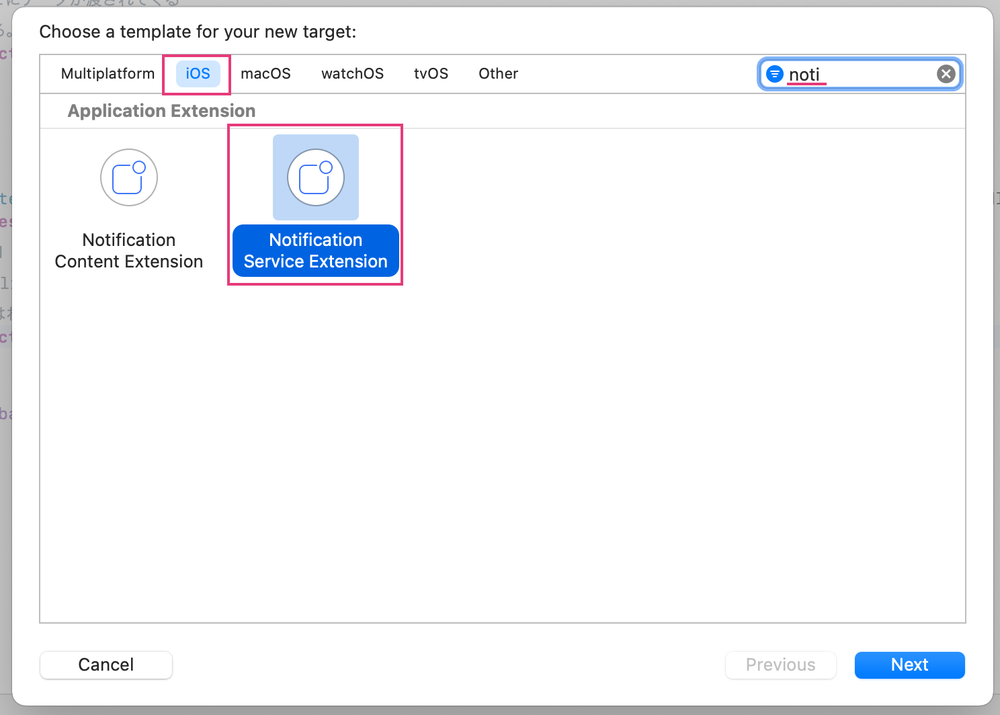
iOSのタブを選択した上で、Notification Service Extensionを選択します。
Extensionの名前を設定します。
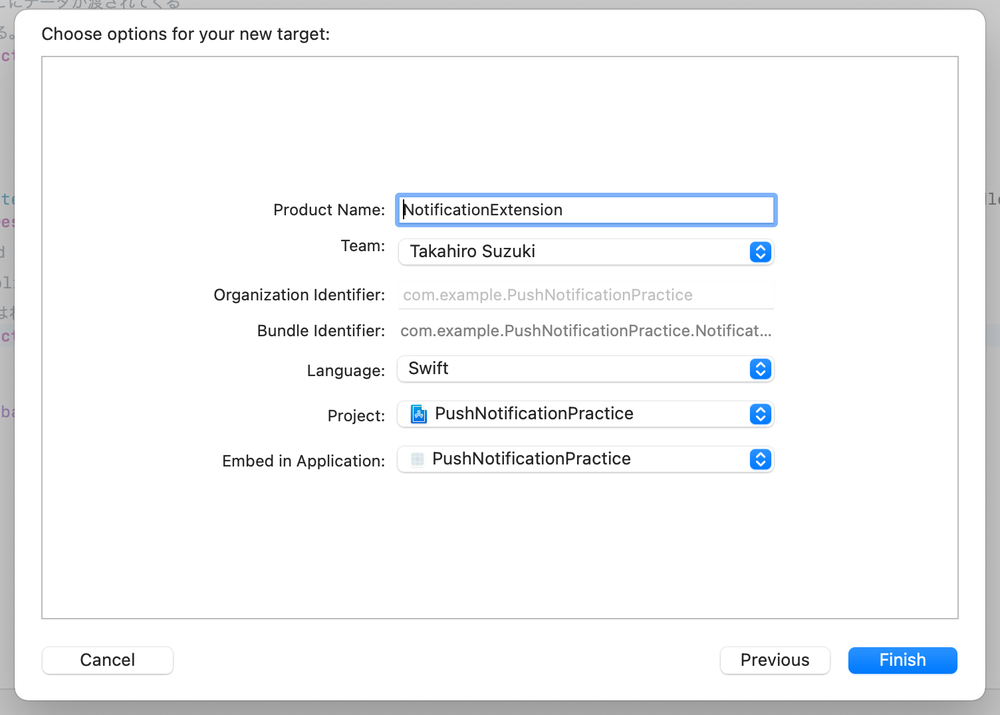
以上の操作で、Notification Service Extensionがプロジェクトに追加されました。
実装を追加する #
先ほど作成したターゲットには、UNNotificationServiceExtensionを継承したNotificationService.swiftというファイルが作成されています。これを開いてみると、すでにある程度の実装が追加されています。
見てみると、2つのメソッドが用意されています。
didReceive(_:withContentHandler:)serviceExtensionTimeWillExpire()
実際にコードを見てみます。
import UserNotifications

class NotificationService: UNNotificationServiceExtension {

    var contentHandler: ((UNNotificationContent) -> Void)?
    var bestAttemptContent: UNMutableNotificationContent?

    override func didReceive(_ request: UNNotificationRequest, withContentHandler contentHandler: @escaping (UNNotificationContent) -> Void) {
        // APNsから届く通知のペイロードに、 `"mutable-content": 1` が入っていると、
        // アプリが foreground, backgroundであっても、キルされていても、必ずここを通過します。
        // このメソッドの実行にかけられる時間は、30秒以内です。
        // 30秒を超えてしまうと、`serviceExtensionTimeWillExpire()`の処理が実行されます。

        // 引数で受け取った contentHandler と request.content を、
        // インスタンスプロパティに保持しています
        // request.content は mutableCopy() を行い、その内容を複製しつつ変更できるようにしています
        self.contentHandler = contentHandler
        bestAttemptContent = (request.content.mutableCopy() as? UNMutableNotificationContent)

        // ここからが、内容の変更処理です。
        // この例ではタイトルを変更しているだけです。
        if let bestAttemptContent = bestAttemptContent {
            bestAttemptContent.title = "\(bestAttemptContent.title) [modified]"

            // 処理が終わったら、変更済みのコンテンツを contentHandler に渡します
            contentHandler(bestAttemptContent)
        }
    }

    override func serviceExtensionTimeWillExpire() {
        // 上の `didReceive(_:withContentHandler:)` の処理がタイムアウト(30秒)した場合に、
        // このメソッドの処理が即実行される。
        // ここを実装しない場合は、オリジナルの通知がユーザーに通知される
        if let contentHandler = contentHandler, let bestAttemptContent = bestAttemptContent {
            contentHandler(bestAttemptContent)
        }
    }
}
プッシュ通知を送ってみる #
内容がわかったところで、実際にプッシュ通知を送ってみます。 以下のペイロードを送信します。
{
    "aps":{
      "alert" : {
         "title" : "Game Request",
         "subtitle" : "Five Card Draw",
         "body" : "Bob wants to play poker"
      },
      "badge" : 0,
      "sound" : "default",
      "mutable-content" : 1
    }
}
すると、以下のように、タイトルの末尾に [modified] がついて表示されます。
タイトルが変わるだけですが、これだけでもかなり感動します。
リッチコンテンツに対応する #
Notification Service Extension を使うなら、リッチコンテンツにも対応したいところです。ここでは、以下のQiita記事を参考にしながら、それをベースに私も実装してみました。
参考資料: https://qiita.com/himara2/items/dcfcc30b550c3304d86a
大まかな流れは、以下の通り。
- プッシュ通知から、リッチコンテンツのURLを取り出す
- URLSessionや通信ライブラリを使用してURLにアクセスし、データをダウンロードする
- Temporaryディレクトリに、ファイルとして保存する
UNNotificationAttachmentインスタンスを作成し、ファイルパスをセットするbestAttemptContent.attachmentsに、ファイルのAttachmentをセットする
override func didReceive(_ request: UNNotificationRequest, withContentHandler contentHandler: @escaping (UNNotificationContent) -> Void) {
    self.contentHandler = contentHandler
    bestAttemptContent = request.content.mutableCopy() as? UNMutableNotificationContent

    if let bestAttemptContent = bestAttemptContent {
        // Modify the notification content here...
        let modifiedTitle = "\(bestAttemptContent.title) [modified]"
        bestAttemptContent.title = modifiedTitle

        if let urlString = request.content.userInfo["attachement-url"] as? String,
           let url = URL(string: urlString) {
            let session = URLSession(configuration: URLSessionConfiguration.default)
            let task = session.dataTask(with: url) { data, response, error in
                let logger = Logger(subsystem: "PushNotificationPractice", category: "NotificationServiceExtension")

                if let e = error {
                    bestAttemptContent.body = "\(e.localizedDescription) \(bestAttemptContent.body)"
                    logger.error("\(e.localizedDescription)")
                    contentHandler(bestAttemptContent)
                    return
                } else {
                    logger.info("No Error.")
                }

                let path = URL(fileURLWithPath: NSTemporaryDirectory().appending("attachement.jpg"))
                // おそらくは、ちゃんとしたファイルパスにしたほうが良いでしょう
                // パス名もプッシュ通知で届けるか、UUIDをつけたりすることで対応できそうです
                // ※ 拡張子は必須です。拡張子がないと、Attachmentのインスタンスができません

                do {
                    try data?.write(to: path)
                } catch {
                    bestAttemptContent.body = "\(error.localizedDescription) \(bestAttemptContent.body)"
                    logger.error("\(error.localizedDescription)")
                    contentHandler(bestAttemptContent)
                    return
                }

                if let attachement = try? UNNotificationAttachment(identifier: "",
                                                                   url: path,
                                                                   options: nil) {
                    // identifierは、ファイル名やUNIXTIMEなど、一意なものにしておくと良さそうです
                    // UNNotificationAttachmentの詳しい情報はドキュメントサイトと見るとよいです
                    bestAttemptContent.attachments = [attachement]
                } else {
                    bestAttemptContent.body = "Creating attachement is failed. \(bestAttemptContent.body)"
                }
                contentHandler(bestAttemptContent)
            }
            task.resume()
        } else {
            bestAttemptContent.body = "Attachement couldn't loaded. \(bestAttemptContent.body)"
            contentHandler(bestAttemptContent)
        }
    }
これで、以下のペイロードを送信すると、通知に画像が表示されるようになります。なお、ペイロードにつけている画像URLは、Twitterで私が公開している画像のURLです。通常は、運営するサービスが持つストレージやCDNのパスになるでしょう。
{
    "aps":{
      "alert" : {
         "title" : "Game Request",
         "subtitle" : "Five Card Draw",
         "body" : "Bob wants to play poker"
      },
      "badge" : 0,
      "sound" : "default",
      "mutable-content" : 1
	},
	"attachement-url": "https://pbs.twimg.com/media/FEwWGJKWQAUh4IR?format=jpg&name=large"
}
これをプッシュ通知すると、以下のように表示されます。
サムネイルとして表示されていますが、もちろん通知を拡大すると、大きい画像で表示されます。
UNNotificationAttachmentについて #
UNNotificationAttachmentのドキュメントページに詳しく記載があります。画像・音声・動画のサポートされている種類やデータサイズなどが、記載されています。
アプリ本体のターゲットと情報を共有する #
リッチコンテンツのロードにログインが必要だったり、事前にアプリで設定されている情報が必要な場合は、アプリ本体と情報を共有しなければなりません。この場合は、以下の方法が考えられます。
- Keychain Sharing
- ログイン情報であれば、Keychain経由がよさそうです
- UserDefault AppGroups
- センシティブではない設定値であれば、UserDefaultsで良さそうです
今回は、UserDefaultsのAppGroupsをセットアップしてみます。
まずは、アプリ本体のターゲットで、CapabilityにApp Groupsを追加します。
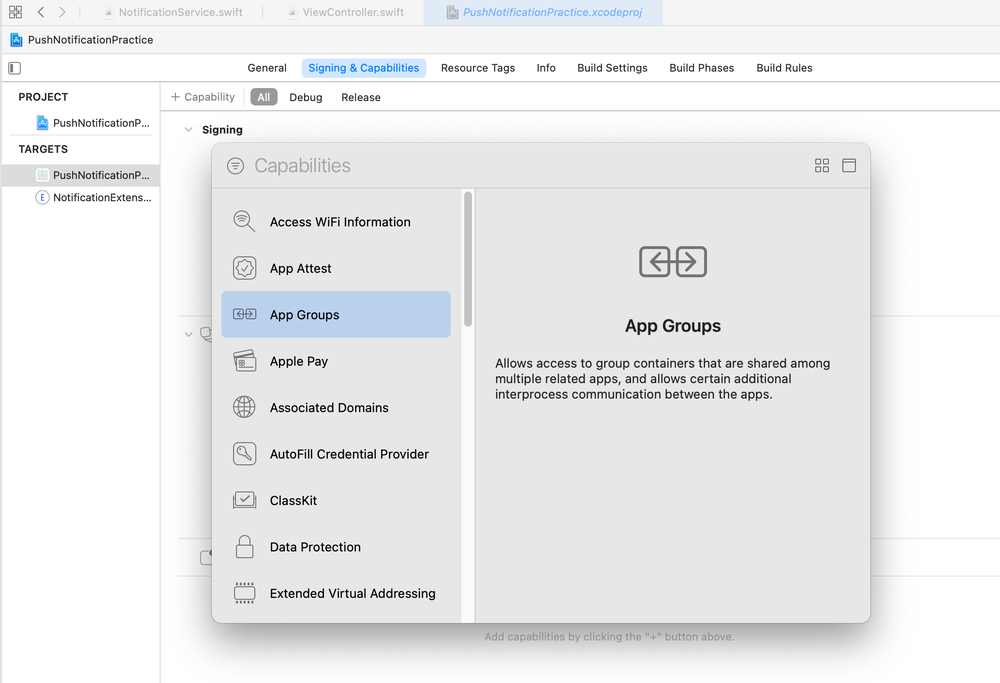
そして、グループのIdentifierを決めます。

Application Identifierを基準に、ドット区切りの単位でしか設定できません(たしかそういう挙動だったと感じる)。
つまり、上記の例ではgroups.com・groups.com.example・groups.com.example.PushNotificationPracticeになります。
次に、Extensionのターゲットでも、CapabilityにAppGroupsを追加します。
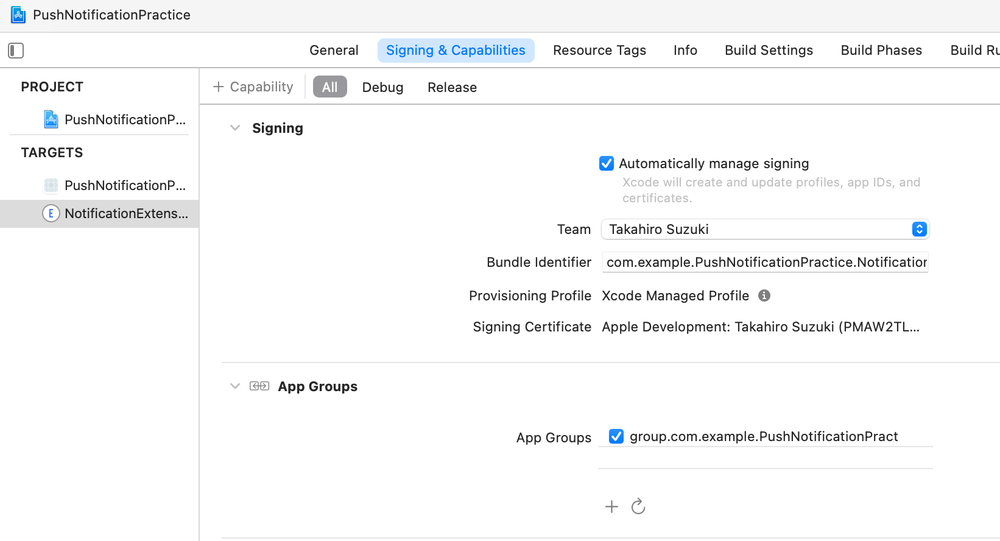
これで、UserDefaultsのデータ共有ができるようになりました。
// アプリ本体側の例
func updateLabel() {
    let defaults = UserDefaults(suiteName: "group.com.example.PushNotificationPractice")
    if let title = defaults?.string(forKey: "PushTitle") {
        tokenLabel.text = title
    }
}

// Notification Service Extension側の例
override func didReceive(_ request: UNNotificationRequest, withContentHandler contentHandler: @escaping (UNNotificationContent) -> Void) {
    self.contentHandler = contentHandler
    bestAttemptContent = request.content.mutableCopy() as? UNMutableNotificationContent

    if let bestAttemptContent = bestAttemptContent {
        let modifiedTitle = "\(bestAttemptContent.title) [modified]"
        bestAttemptContent.title = modifiedTitle

        let defaults = UserDefaults(suiteName: "group.com.example.PushNotificationPractice")
        defaults?.setValue(modifiedTitle, forKeyPath: "PushTitle")
    }
}
まとめ #
Notification Service Extensionを使用して、プッシュ通知を表示する前に処理を差し込む方法をまとめました。 このExtensionは、バックグラウンドプッシュとは異なり、アプリがキルされていても必ず実行される点も特徴の一つです。
そのため、リッチコンテンツに対応したり、バッジに表示する数字をフェッチしたり、あるいは通知を受信したことをサーバに通知したり、ユーザーが設定した時間は音を鳴らさなくするなど、使い方次第で、ユーザーの体験をぐっと向上させることができそうです。
Notification Service Extensionは、新規アプリなら初期バージョンから入れていても良いくらい便利な拡張かなと感じました。
(これまでの投稿)